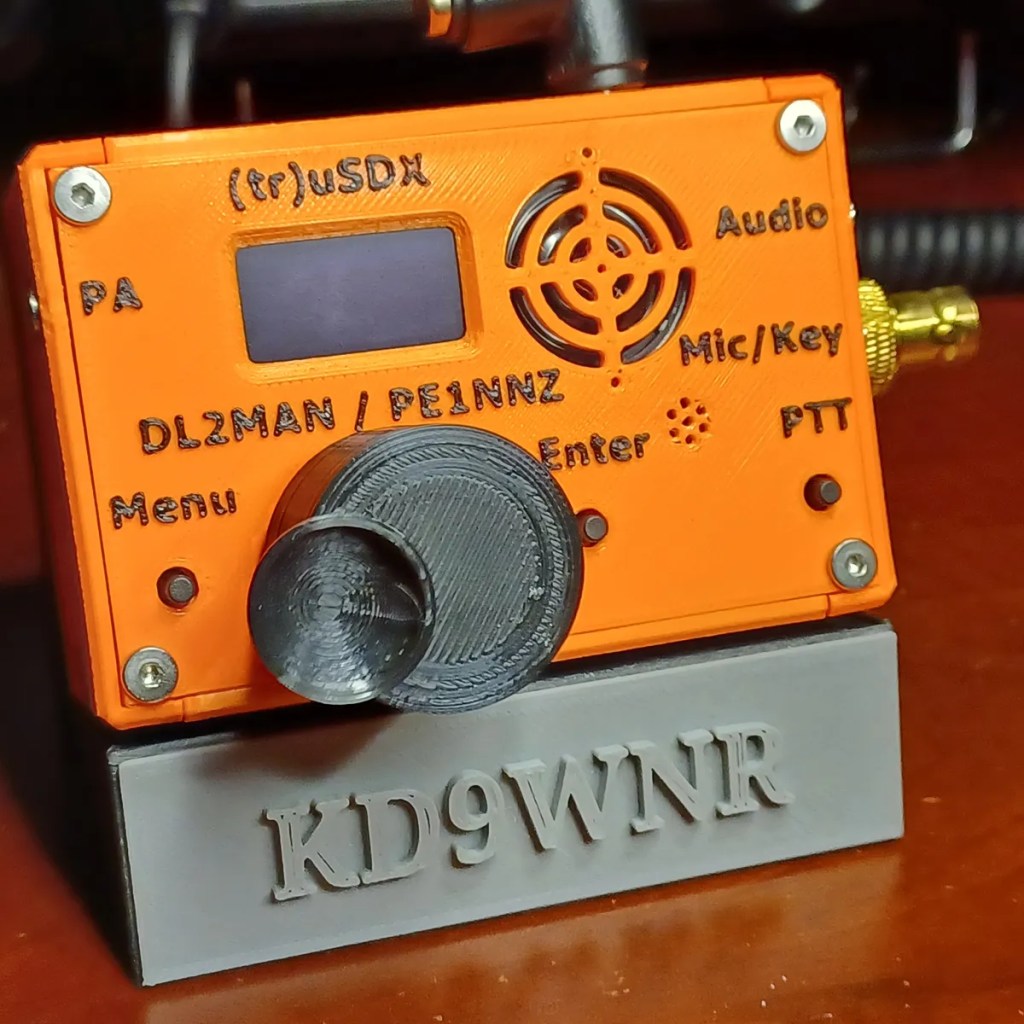
The (tr)uSDX is a 5-Band / Mulitmode QRP Transceiver in Pocket Format (90x60x30mm – 140g). It features a highly efficient Class E PA and Supports CW/LSB/USB and AM/FM. It covers by default 80/60/40/30/20m
The (tr)uSDX is a little bitty Software Defined Radio (SDR) that’s not much bigger than a pack of cigarettes. It´s the Result of the Collaboration between PE1NNZ and DL2MAN. The design was intended as an easy to build Kit. But, assembled units are available on Amazon and Aliexpress from “approved” sellers.
DL2MAN, Manual Klaerig, is the driving force of this open-source fun little transceiver. Manual maintains a website that describes the (tr)uSDX and everything about it, so I won’t regurgitate it here.
When I first got my General… I tried FT8 using my 54′ Random Wire End-Fed and was surprised at the performance of this rig. I put out 5 Watts at 50% duty cycle for over six hours straight several times… No overheating, no blown finals.
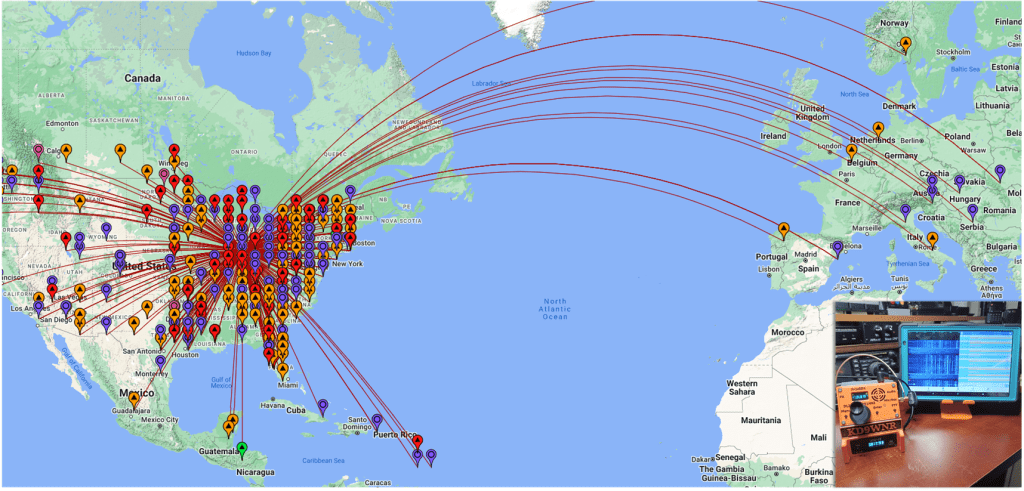
In my first attempt, I made 22 contacts, with one confirmed QSO to Italy! I’m in Chicago!
Some Hams don’t like FT8. It’s pretty much two computers talking to each other over the air. But, as a weak-signal mode I still have a lot of fun racking up contacts. Over the course of a few weeks I had over 600 QSO’s, some many miles away.
Looking at the Map. you can see I’m not getting out West so much… That’s because my Antenna is a Sloper, blocked by my house to the West 😦
I took my (tr)uSDX on my very first POTA Activation and had over 20 contacts in just a few hours.
If you want to have some fun, you can get a (tr)uSDX Kit for about $100, assembled units are about $140. I mentioned “approved” sellers… Manual evaluates samples from sellers, so you can be confident you will get a functioning and registered unit. I got mine on Amazon from the Malahit Store.
I’ve found that there’s more than a few Hams that have 3D Printers. I can see why… For me there were commonalities in 3D Printing that drew me into Ham Radio. Aside from both hobbies requiring an above average level of Tech Geekiness
In the middle of learning a new hobby (Ham Radio), I started another… 3D Printing. I apologize for not posting for awhile; I’m just now coming out of the obsession phase in regard to 3D Printing. I’ve found that there’s more than a few Hams that are also 3D Printers (design or customize what they print), or Makers (makes prints of others designs). I can see why… For me there were commonalities in 3D Printing that drew me into Ham Radio. Aside from both hobbies requiring an above average level of Tech Geekiness:
Requires enjoying learning new PC software applications. And,
Learning a new vocabulary and the terminology of 3D Printing
Takes hours of Searching Reviews and Info on the Internet and YouTube
Integration of the Raspberry PI is fully supported, in many ways!
You may even get to splice a wire or two!
But the best part is… There are an abundance of free, OPEN SOURCE resources available, such as Printing Software, Design Software (CAD), and endless “Models” of stuff folks have designed for you to download, print, and use, under a Creative Commons License.
There are many websites to search for and download 3D Models. My favorite is Printables.com(link to my profile). The site is sponsored by Joseph Prusa, who founded Prusa Research (2012), a Czech 3D printer company. They are known for innovative and quality built 3D printers, and supplies; Admirably, they have an Education Program supporting elementary to university learning, and libraries, clubs, etc…
There’s plenty of stuff that will interest Ham Radio folks available to download and print on Printables.com(link to “hamradio” keyword). As an example, here’s a slideshow of some of my “hamradio” Models:
An account on Printables.com is totally free. Even better… If you choose to contribute to the community, you can earn points that can be redeemed for filament, training courses, hats, t-shits, cups etc.. Earn and save up enough, you can even get a Pursa Printer!
So… That’s why there’s a 3D Printing category in a Ham Radio Blog.
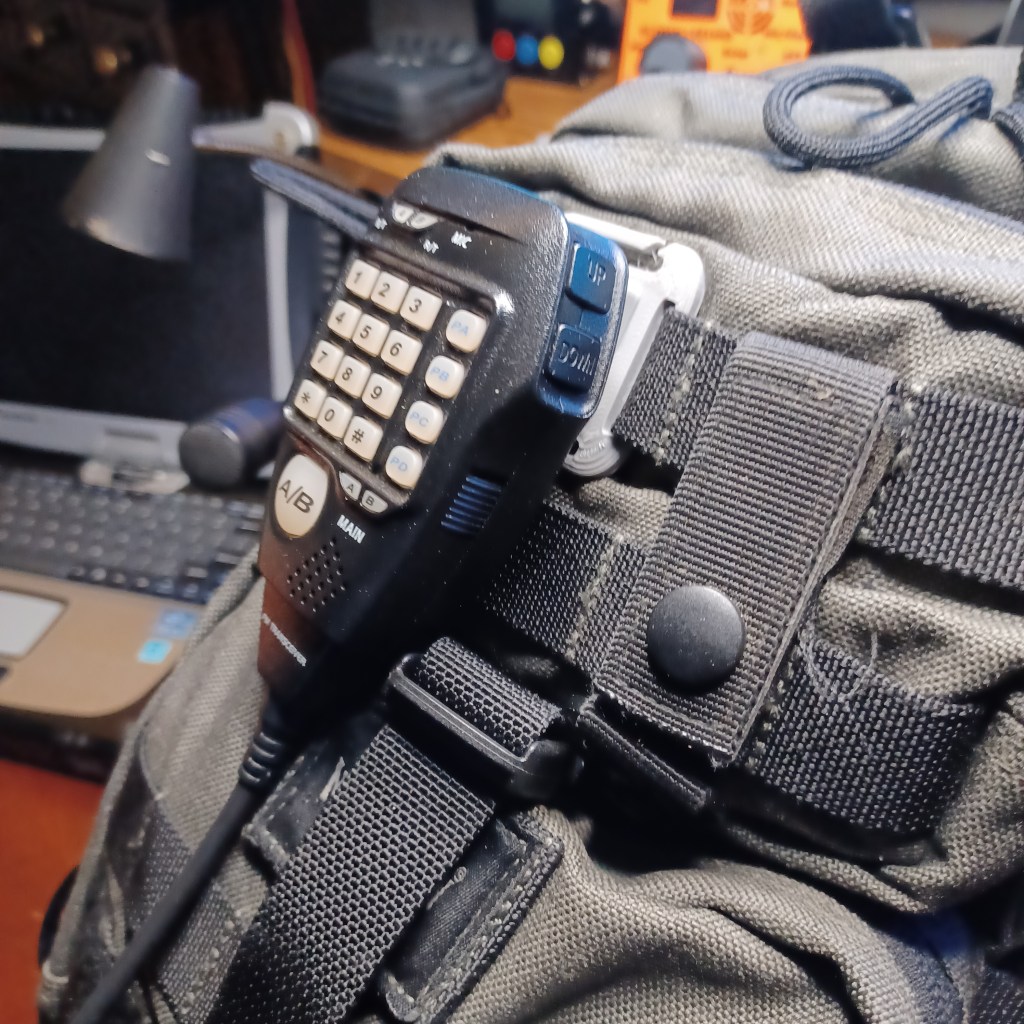
I turned the HT on one day and the Up/Down buttons and two columns on the left side of the numeric keypad stopped working. Being I’m a highly experienced US military trained Electronics Technician, I knew exactly what to do… I banged it against the table until It started working.
The Baofeng UV-17 is a fun HT to play around with. I posted a review on this HT titled: Baofeng UV-17???. The question marks are my cute attempt to express the confusion that exists on the various models of the UV-17. I’m pretty sure the info in this post would apply to all variants of the UV-17, and likely apply to a good many HTs out there by varying manufacturers.
After only several weeks of light use, I turned the HT on one day and the Up/Down buttons and two columns on the left side of the numeric keypad stopped working. Being I’m a highly experienced US military trained Electronics Technician, I knew exactly what to do… I banged it against the table until It started working 🙂 Unfortunately, that “fix” didn’t last very long.
At least I knew it was probably a connection problem like a cold solder joint, or pinched cable and not a firmware or component failure problem… Whew!
Needing to take it apart to have a look-see, I ordered a X-Key to remove the castellated retaining rings under the antenna and knob. It can probably be done without this tool using a pick, or a pair of needle nose. But, this $5 tool makes it a lot easier.
I was lucky that just opening up the unit moved something just enough to make it start working again. I didn’t want to damage it by dismantling it further… If it works, don’t…. So I just slapped it back together. So far it’s been working fine.
The strongest argument for the Baofeng haters is that these radios are noisy when transmitting… However, it appears that Baofeng has improved spectral purity on their more recently produced radios.
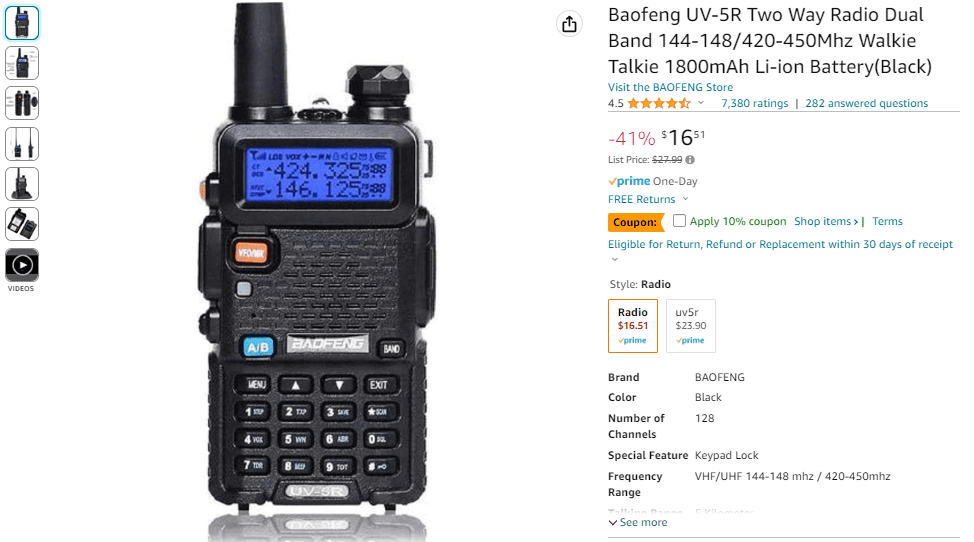
Like many, my first “Ham radio” was a Baofeng UV-5R. This radio has been around since 2012; The base model is still available and is essentially the same as it was over 10 years ago. I’d be willing to wager that there are more UV-5R based radios in the hands of consumers than any other HT made. I say consumers, not Hams, because there are a lot of these sold to people that do not have a license to transmit with it. The UV-5R can be found online everywhere… Amazon, Ebay, and Chinese market sites like Aliexpress and Temu. These radios are cheap… The basic 5W dual-band version can be had for less than $20.
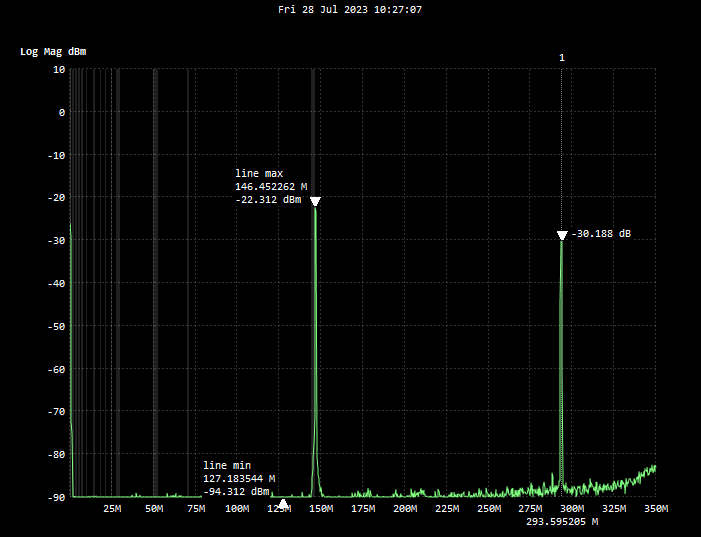
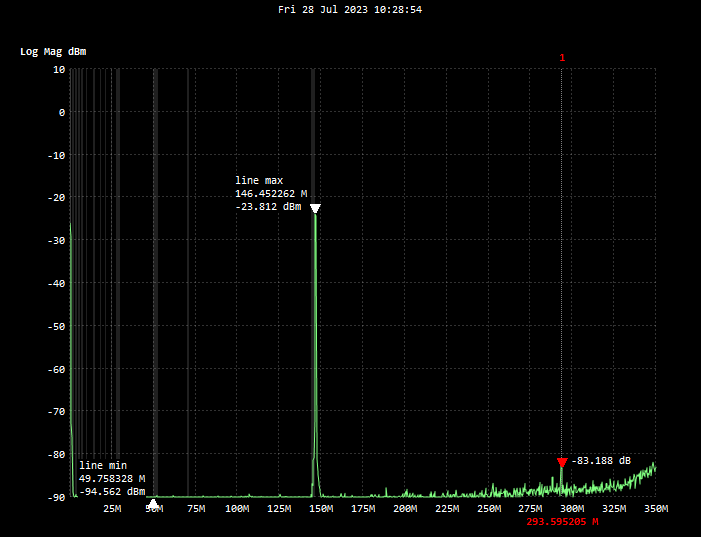
Be advised… There are some Baofeng haters out there in the Ham radio community. Their strongest argument is that these radios are noisy when transmitting. Meaning, it transmits harmonics at a level that is so high it can potentially interfere with other signals outside of the Amateur Bands. FCC requires that the second harmonic be greater than -40db from the selected transmit frequency… Consistency in Quality on these radios is very poor; Some Baofengs are lucky to get the harmonics down to -20db. There’s no disputing that, and all agree that it is not a “good thing”. However, it appears that Baofeng has improved spectral purity on their more recently produced radios. To prove this, I compared my first Baofeng UV-5RIII with a recently purchased UV-5R; This one is limited to Ham bands. As you can see from the test… Not all Baofengs are noisy.
The second harmonic on the new Baofeng is -57db from the fundamental… A winner!
The Baofeng haters also point out that the Receiver on the Baofeng has very poor filtering; Unwanted signals saturate the receiver and can make the radio go “deaf”. I don’t doubt it; But, I have not personally experienced it. Either way, I’m not interfering with anyone so what’s the beef? And third, there is a perception that UV-5R users operate these radios illegally and transmit on frequencies not authorized by the FCC. This perception is supported by the many who do exactly that. But it’s not the Radio’s fault. The best thing we can do as Hams is try to keep educating the public on what these radios are, and what their legal use is.
It’s been said; “You’ll always Love your first girl.” Well, I still love my Baofengs. I learned a lot about two-way radio from my UV-5R. And, I’m still amazed at the features that are packed into this tiny $20 radio. I continue to monitor social media groups and websites that focus on Baofeng Radios, and it seems the same questions come up over and over again. Some of these FAQs I’ve added here:
What frequencies do I enter in the UV-5R to receive Police and Fire communications? You can’t… Most Public Service organizations have moved to digital transmissions. The UV-5R is an Analog FM Radio. It can not receive digital transmissions of any kind. Some rural areas may have agencies that are still using analog for Public Service activity… You’ll have to check locally.
Can I receive Air Band communications used at my local airport on the UV-5R? No… The Air Band Frequencies (108-137 MHz) are out of the range of frequencies the UV-5R works on (136-174 MHz). Additionally, the Air Band uses AM modulation; The UV-5R is FM only.
Can I receive FRS and GMRS communications on the UV-5R? Yes… The UV-5R can be programmed to receive the FM Frequencies in the 462MHZ and 467Mhz ranges used by the Family Radio Service (FRS) and General Mobile Radio Service (GMRS).
Can the UV-5R be programmed to transmit on FRS and GMRS frequencies? Maybe… Most UV-5R radios have the UHF RX/TX frequency range of the original, from 400 Mhz to 520 MHz. FRS and GMRS are within this range (462 and 467 Mhz). However, some of the newer UV-5R being sold on Amazon and other US outlets have a UHF frequency range of 420 Mhz to 450 Mhz; This limits use to the US 70cm amateur band and prevents transmitting on the FRS and GMRS frequencies. Which brings us to the next, and most controversial question…
Can the UV-5R be used to talk on FRS and GMRS bands? Yes and No… While most UV-5Rs, as mentioned above, can be programmed to do so; It is illegal to use a UV-5R to communicate with others on FRS or GMRS. Note: There are GMRS variants being sold by some US distributors called the UV-5G or UV-5X; These have firmware limiting use to the GMRS Band.
It is illegal to transmit on FRS or GMRS frequencies using any radio intended for use on the Amateur Bands. Radios for FRS/GMRS must meet certain FCC requirements like maximum power, locked channels/modes, non-detachable antennas, etc, etc… It’s OK to listen, but don’t hit the PTT button, unless it’s an “emergency”.
So, on what frequencies or bands is my UV-5R legal to use? The UV-5R is legal for use by licensed Ham Radio Operators on the 2 meter (VHF) and 70 cm (UHF) Amateur Radio Service bands; These are the frequencies between 144-148 Mhz, and 420-450 Mhz respectively.
Bottom line is… The Baofeng UV-5R is a Ham radio. It should be used by licensed Ham’s who know what frequencies to receive and transmit on. It is not the best choice for stuff like: talking to your buddies while out 4-wheeling or hunting, nor giving them to family members for emergencies in case the phones go down. Unless of course, all operators are licensed Hams. If not, you’re probably better off with an FRS or GMRS radio. These radios are pre-programmed with “channels” and are ready for use out of the box. FRS is low power, so it’s only good for short distances; Use of FRS radios does not require a license. GMRS allows higher transmit power and repeater use. But to be legal, at least one family member needs a GMRS license. There is no test, but there is a $35 fee; The license is good for 10 years!
If you just got, or are working toward getting, your Ham license and want an inexpensive “learning tool” or first radio, I personally think the basic UV-5R is not a bad choice:
There’s a ton of articles and YouTube tutorials on the UV-5R
Accessories and extra batteries are inexpensive and easy to find online
It’s cheap! No big financial commitment until you have more knowledge to make a better choice on equipment needs
The UV-5R (and most variants) is fully supported by CHIRP
The majority of traffic on the 2m and 70cm Ham bands is FM analog “Phone” (voice). Hams talk to each other on these bands using Repeaters; A repeater uses two different frequencies to RX and TX. The number of available repeaters and the frequencies they operate on will vary depending upon the area of the country you are in. If close enough, Hams can communicate directly from one radio to another using Simplex., where both radios are set to the same frequency for RX and TX. In the US, these frequencies are defined in the Band Plan. You’ll want to follow the Band Plan.
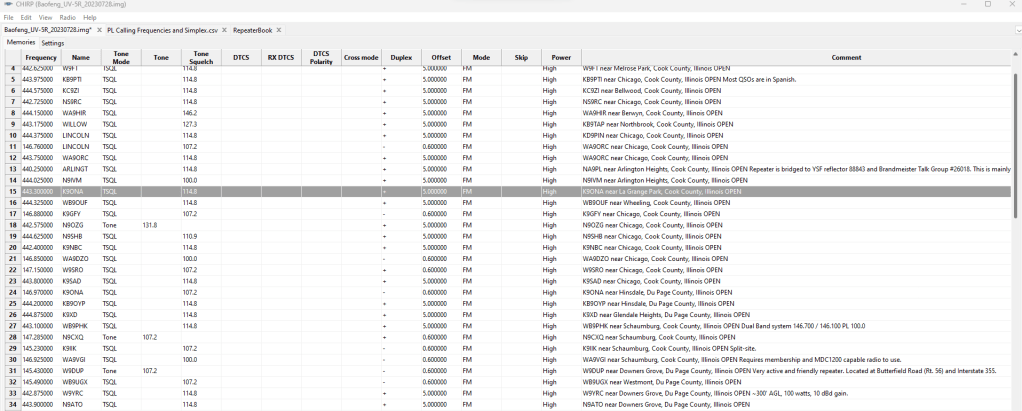
The easiest way to get all the Repeater and Simplex frequencies in your radio is to use Computer Programming Software (CPS). Most radios will have a CPS available from the manufacturer of the radio… Some of these are bare-minimum and are “clunky” to use. Instead of the OEM CPS, many, many Hams use CHIRP to program their radios. CHIRP is the most popular open source (free) CPS, and it is compatible with not only the UV-5R and all the variants, it works with most popular HT’s from major manufacturers. With CHIRP, you can search for local repeaters by your location via query. The frequency settings returned by the query are easily cut-and-pasted into your Memory/Channel list. There are also utilities to add frequencies to your radio for FRS, GMRS, NOAA Weather, etc.. Assuming your radio works or allows programming at those frequencies. You’ll need:
A CHIRP compatible radio
A USB Programming Cable for your radio
A PC running Windows
Screenshot of CHIRP with my Local Repeaters, ready to Upload to Radio
There’s plenty of videos and tutorials on how to use CHIRP. Since I can’t improve on what’s already out there… I’ll just say that learning to use CHIRP is almost a “rite of passage” for a new Ham. Mastering CHIRP is a good way to learn how to setup a Ham radio using CPS. This is an essential skill you need to get started.
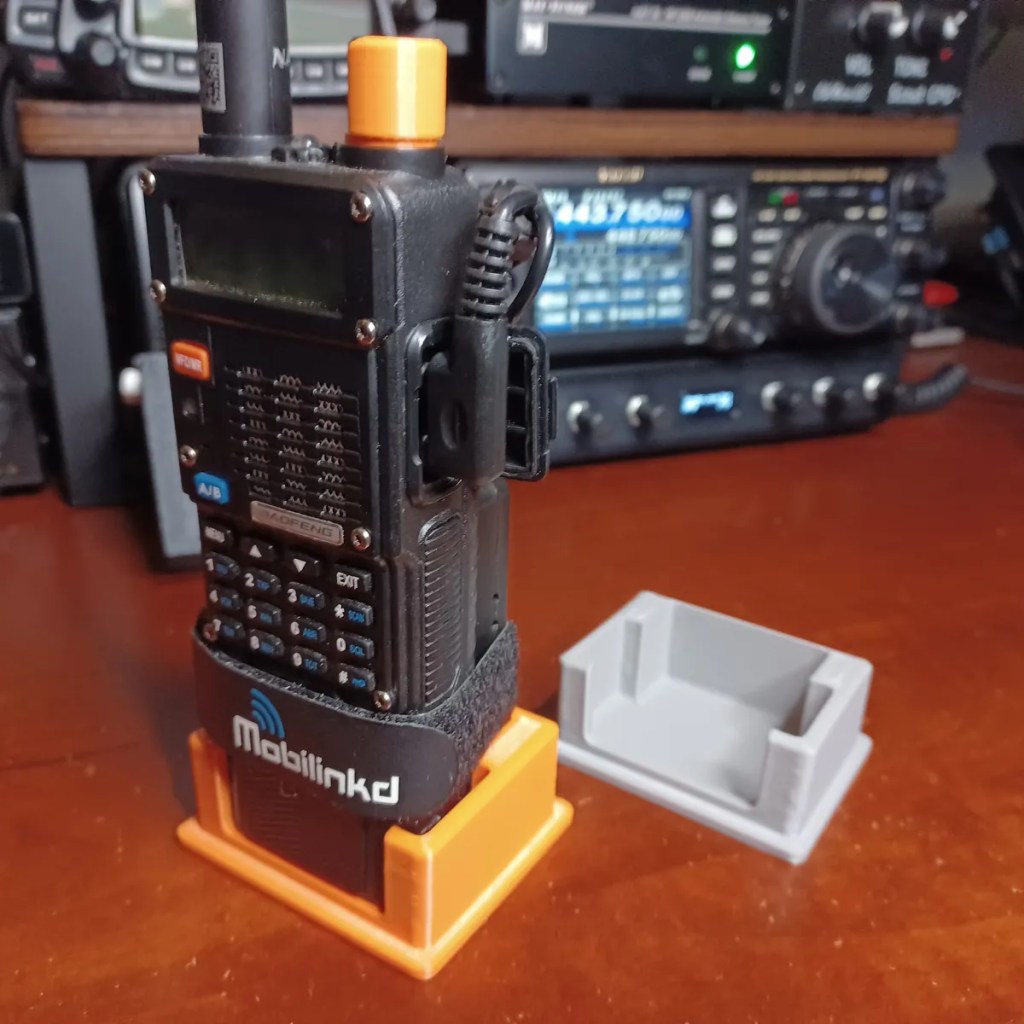
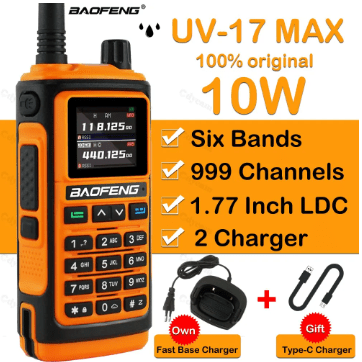
I like the orange color for a SHTF Go-Bag Radio and it’ll be easy to find and not get lost. The radio has a solid feel, fits comfortably in the hand and is easy to operate from the Menu. The display is a huge step up for Baofeng; Gives the impression it’s an expensive radio…
There’s been a bit of buzz about this new radio in the Baofeng Owners Club on Facebook. This model is significantly different from the many UV-5R variants Baofeng continues to pop out… This one offers several unique features that are “firsts” for a Baofeng:
Receives Airband AM
1000 Memory Channels
10 Memory Banks, 100 Channels Each
One Button NOAA Weather (Pre-programmed)
USB-C Charging Port
Full Color Display
GPS (Optional)
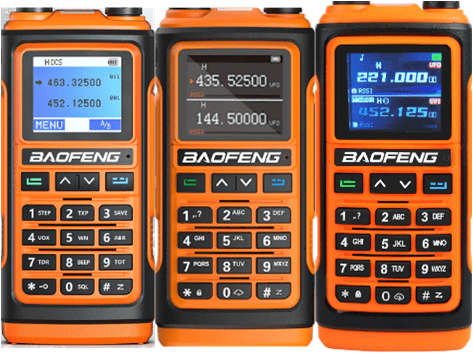
There seems to be confusion on the variants of the UV-17 and with the different features and firmware in the models advertised on Aliexpress. There’s a UV-17 Pro GPS… This appears to be the top of the line with GPS and a color LCD. Other models are advertised as the UV-17, UV-17 Pro, and the UV-17 MAX. Adding to the confusion, there are three different displays, and two different keypad layouts… If you order anything other than the “GPS” model, what you will receive is a bit of a crap shoot.
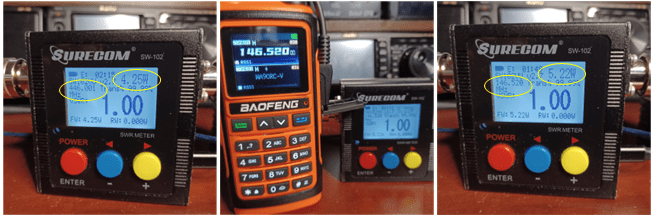
I purposely ordered what was advertised as the UV-17 MAX, which had all the features of the 5 watt “GPS” model, without the GPS. Instead of GPS, it was advertised as having 10 watts of output power. BS!!! Output power on VHF was 5.22 watts and 4.25 on UHF; What I expect for a “5W” radio. After playing with it, I’m pretty sure what I got is a UV-17 Pro GPS, with the GPS circuitry removed… Just simply not installed. There’s menus and screens for GPS, and the display indicator that GPS is on lights up, but it’s always “Searching”.
The Seller probably had the GPS components omitted to save a few bucks, and false advertised it as as 10W radio to sell it at the same price as the GPS model. In the pic, a factory label is on the left… My label is on the right. Do not buy from KGB Radio… I should have known better from their name 🙂
I've heard of folks getting burned on Aliexpress... I've bought Raspberry PI's, a DM-5R HT and a couple of MMDVM Hats on AE, all went well. But, some folks complain about their stuff not showing up or not working when received; Processing a return is costly and time consuming.  Also, you've got to be careful what the advertisements say... Sellers often put a picture front and center in their advertisement of a top of the line full kit. But if you click the wrong option, you end up with a partial kit or a cheaper model.

Then, there's all out false advertising from Sellers like KGB Radio. Do not buy from this Seller! They advertise a 10W radio, and what you get is a 5W radio at best.
When your Order is Delivered, you receive an email from Aliexpress asking you to Confirm Receipt… There is also a “Dispute” option. To dispute, you need to submit pictures or video showing the problem; I sent them the picture below and complained that the radio was not as advertised. The dispute first goes to the Seller (KGB Radio). Their response was: “The buyer is not using official testing instruments from Baofeng. Therefore, the test results cannot prove that our product has insufficient power Please use the official testing equipment from Baofeng for testing.” In the email response, you have the option to accept or reject the “solution” offered. That didn’t even warrant a response. I simply clicked on the “Reject” button. After three days, Aliexpress intervenes. I don’t know what goes on between Ali and the Seller. But on the third day, I got an offer for a partial refund of $20.43. That offer I Accepted 🙂 So, I got this UV-17 Pro No GPS for $16
These UV-17’s are advertised as 220 Mhz TX capable. That BS is on Baofeng, not the Seller. All the UV-17’s claim TX/RX on the 220 Mhz band. Before ordering mine, I read reviews from folks that were saying that the output on 220 is in the milliwatt range. So I wasn’t expecting much on 220… When I checked mine, the 220 band output is so low, it won’t register on my cheap SWR/Power meter.
10 Watts? Nope… Seller lie; 220 Band? Nope… Baofeng lie. Getting past these two disappointments, lets move on to the look and feel of the radio itself… I like the orange color for a SHTF Go-Bag Radio and it’ll be easy to find and not get lost. The radio has a solid feel, fits comfortably in the hand and is easy to operate from the Menu. The display is a huge step up for Baofeng; Gives the impression it’s an expensive radio… Looks almost like a Yaesu FT-5; Until you get into the daylight. The display is very hard to see outdoors during the day, and impossible in direct sunlight; There is no intensity adjustment. On the bottom of the radio are two LEDs for the flashlight that Baofeng must think is such an important feature.
The one button NOAA Weather and broadcast FM is nice. And there’s a programmable button (SK2) below the PTT Switch for Scan, Vox, etc.. One other minor disappointment; As you can see from the pics, with the frequency display option, you get a nice bright block digit presentation. But if you choose to display the memory channel name, you get a lame, small font readout (see A vs. B Band in pics).
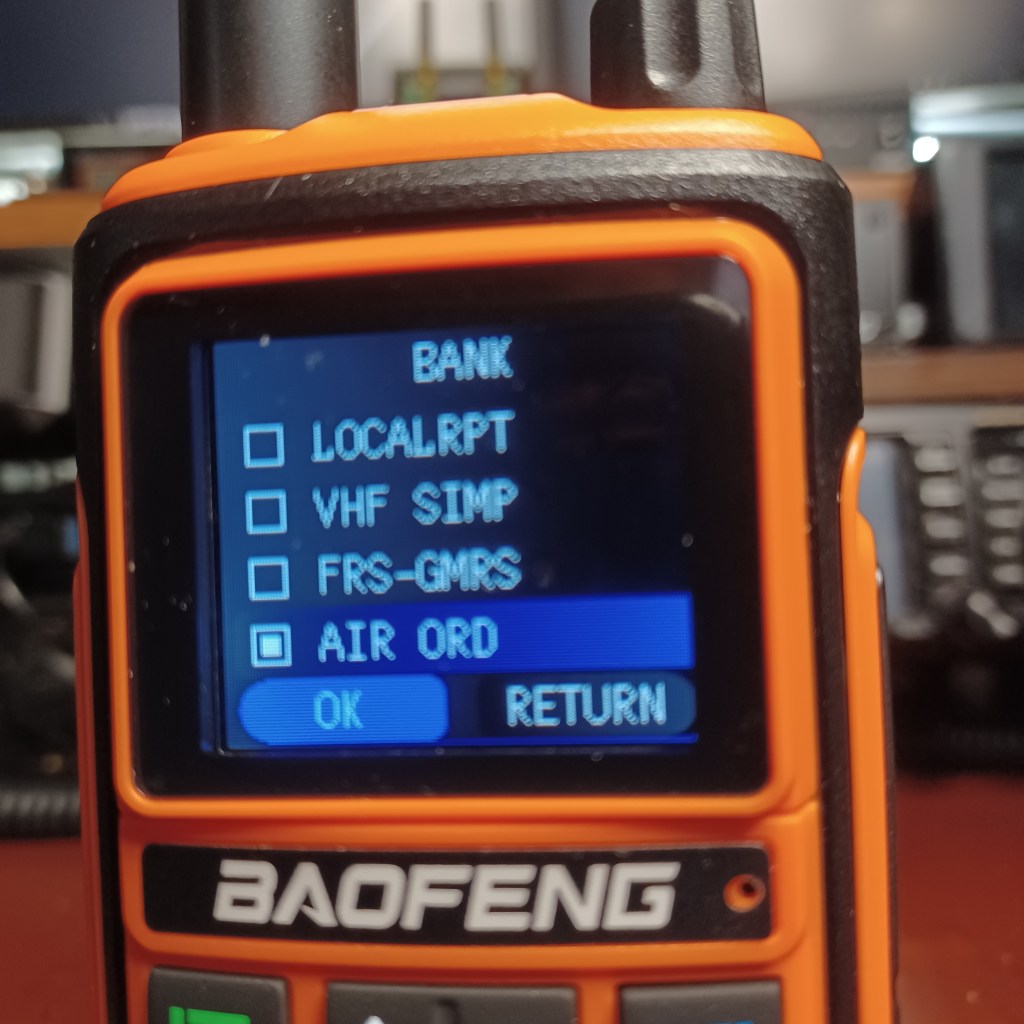
IMHO: The most outstanding feature of this UV-17 is the Menu. Despite a spelling error or a translation ambiguity or two, I found the menu system visually appealing, with an intuitive structure. What really sticks with me is, the “Banks” menu. When I first turned it On… there were Chinese characters on the screen. This was the default “Zone1” in Chinese. In the radio they’re called Banks; In the CPS, they’re named Zones. It’s apparent that at Baofeng, the firmware guys don’t talk to the CPS guys 😦 Out-of-Box, my radio had a dozen or so worthless memory entries in Zone 1, and by default all Zones are named in Chinese; Simply rename them in the CPS. But what’s really cool… When you open the list of Banks on the radio, only the Banks (Zones) that have frequencies show up on the list. The radio menu is not cluttered with unused Banks named in Chinese. I thought that was a nice touch.
Be advised: As of this post date, the UV-17 is not compatible with CHIRP 😦 If you rely on CHIRP to get local repeaters, GMRS and other frequencies, you are out of luck. A request has been submitted to add CHIRP support for the UV-17 but until then, you’ll have to program from the keypad, or use the clunky CPS that Baofeng threw together for this model. There’s no cut and paste, and no import/export to CSV. Each channel must be manually entered into the CPS. If you plan to fill up the 1,000 memory channels this radio has… You’re in for a lot of typing. If this is your first radio; gathering all the frequencies will be a chore. It’s much easier if you have the CPS from another radio with all the channels you want so you can just transcribe them from one CPS to the other. The good news is that the memories are arranged in 10 “Banks” or Zones of 100 memory channels each. I put local repeaters, VHF Simplex, FRS/GMRS and Air Band each in separate Banks… Keeps things nice and tidy.
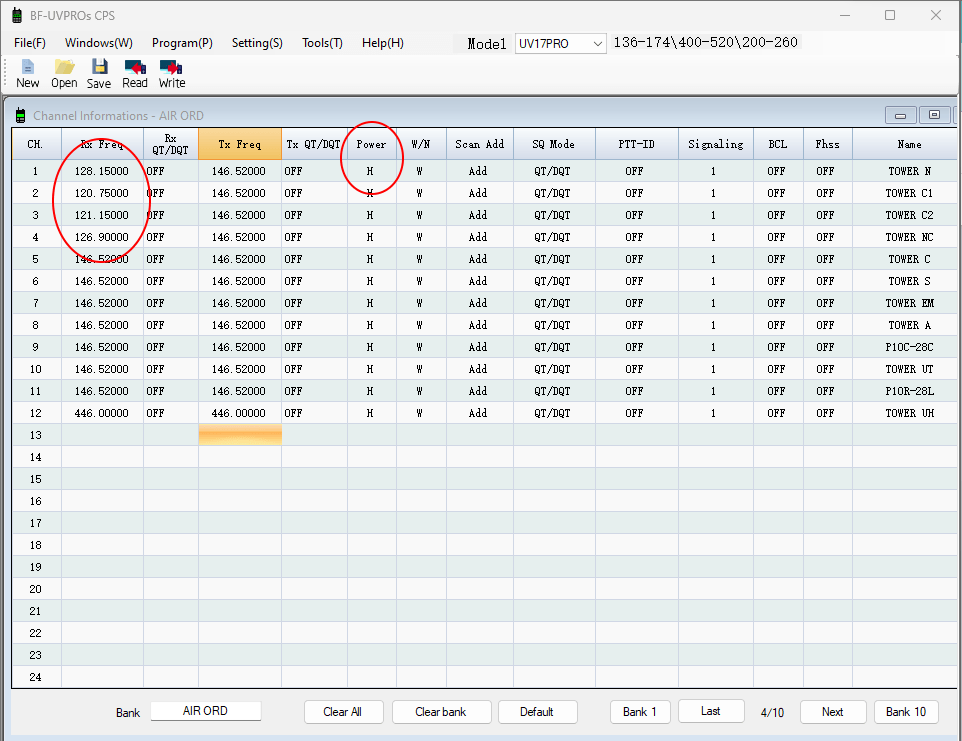
Above is a shot of the CPS. It was taken while I was in the middle of programming the Airband. Programming Airband on this radio is a bit tricky, as the CPS will not accept entry of frequencies in that range. Apparently, the Hardware guys don’t talk to the CPS guys either 😦 There’s is a workaround… The screenshot with the frequencies in the 120 Mhz range was taken after a “Read from Radio”… Those frequencies had to be entered manually on the Radio. The trick is to setup the CPS with memory channels for the number of Air Band frequencies you want, by entering a frequency in the VHF range the CPS will take, ( I used 146.520, the VHF Call Freq.) and naming it in the last column; It only accepts eight characters. There is no “Mode” setting for AM… The radio must recognize the RX frequency is in a band where AM is used. Set your Scan Add = “Add” as desired, and you’re ready to “Write Data To Radio”.
Update: See comment on this post by Terri Kennedy. She has modified the CPS to allow entry of frequencies in the Air Band range. The modified CPS also allows export/import of CSV files of your frequency lists. Thanks Terri!

Also note: Leaving the Tx frequency blank in the CPS (and uploading) will prevent the radio from Transmitting on that memory channel.
It is much easier to edit the Frequency of an existing memory on the radio, than to enter an entirely new memory channel from scratch. To make sure that once the Air Band frequencies are entered in the radio they could be downloaded from the radio, I manually edited the first four memories and did a Read… Hooray! Also note that there are only two “Power” options “H” or “L”, there is no “off”. I edited the other memories, and changed the TX Freq to a seldom used by anyone VHF simplex frequency, just in case I accidentally hit PTT while listening to Airband.
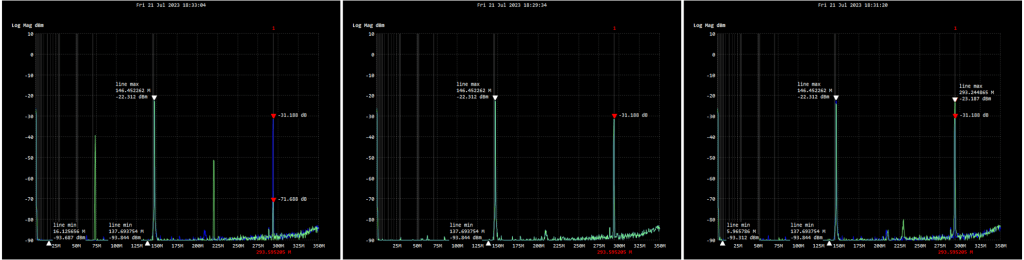
This UV-17 is the noisiest radio in my collection. Baofengs are notorious for harmonic and spurious emissions. Here is a plot of the UV-17 compared to my UV-5R III and a UV-5R MK5 (8W). While the first harmonic is better on the UV-17, there’s second order harmonics not present on the other two.
For me, the UV-17 is an interesting radio to play around with. It’s nice to see something really new from Baofeng for a change. The radio looks cool, feels good in the hand, and has an improved menu system. But, it’s still a $35 Baofeng. Impressive, and a lot of value for a $35 radio. But, without CHIP and as noisy as it is… I don’t see my getting much use out of this radio other than as an oddity in my collection. The UV-5R is a much better EDC or backup radio. For anything serious, I’ll stick with my Yaesu.
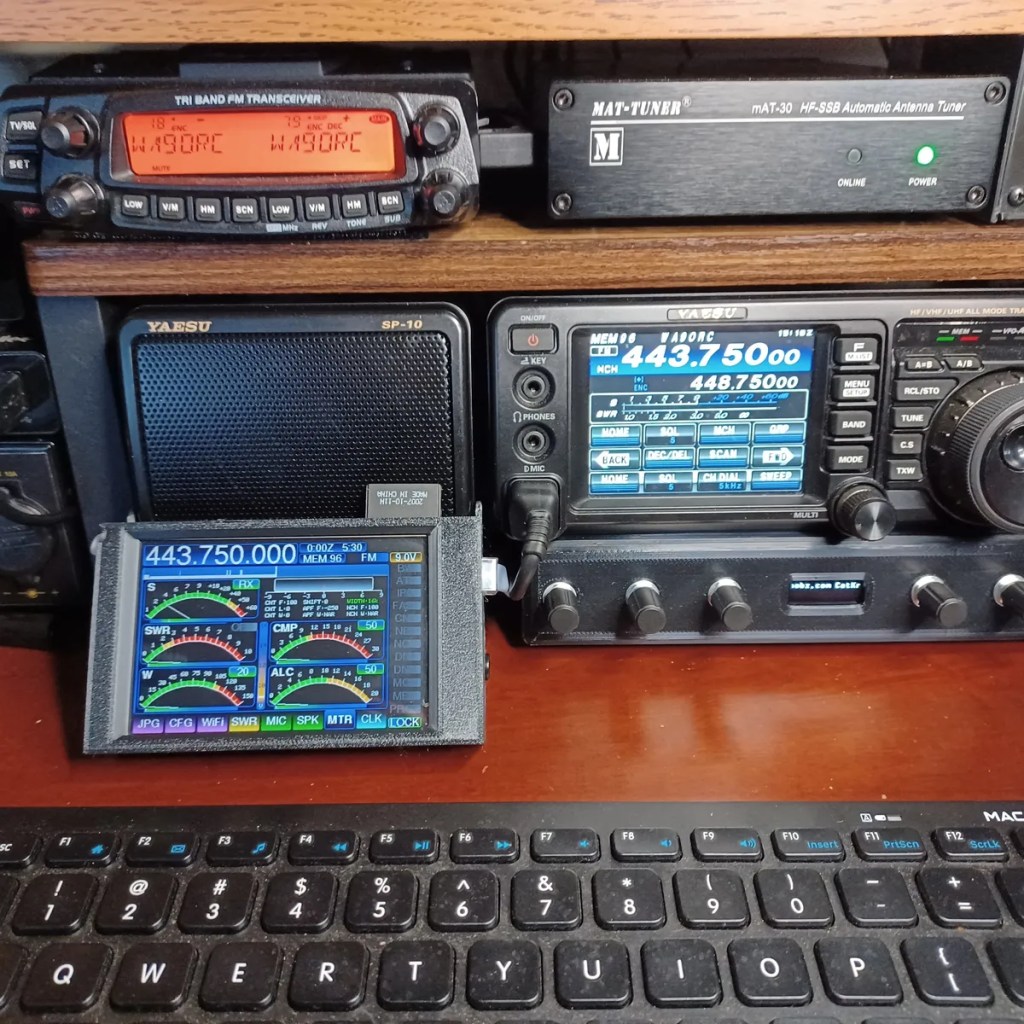
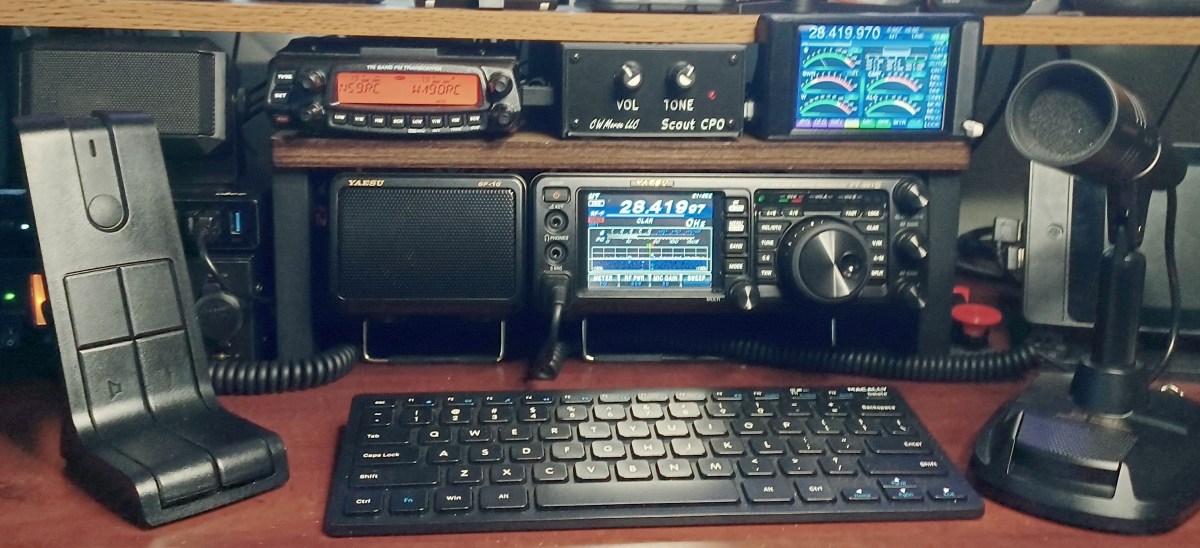
So, I went on Amazon and got a couple of breakouts to cross-wire it all up. After a few quick test QSOs, I was getting reports of low audio. That’s when I found out the TYT Mic was intended for use at 9 Volts…
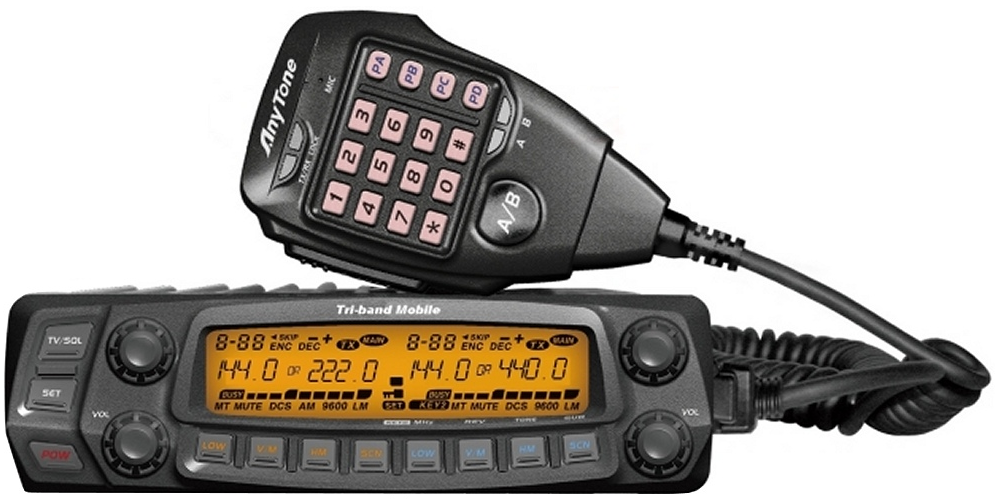
I had a TYT TH-9800 that crapped out after a few months. I was able to get a refund on the radio, but I was now stuck with a TYT DESKMIC1 and nothing to use it with. When I got the Anytone AT-5888UVIII to use in my shack for 222Mhz, I was bummed to find the Mic was not compatible (why would it?).
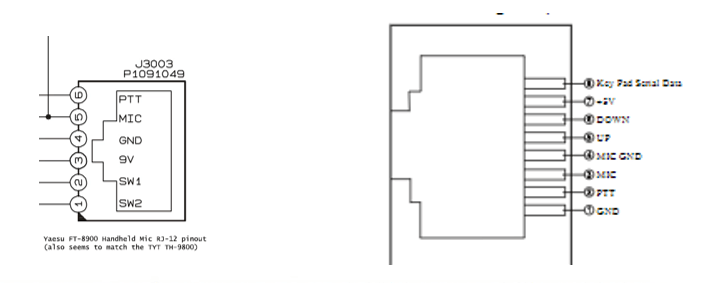
There is an Anytone QDM-01 desk mic for the AT-5888. It is physically exactly the same as the DESKMIC1 except: The Anytone uses an 8-pin RJ45 and the TYT uses a 6-pin RJ12 connector. I didn’t want to spend another $60 for something I already had… I was determined to make this Mic work with the new radio.
Unlike the radios in the article Not All CCRs Are Cheap... I do believe both these microphones were made in the same factory. Probably a Chineese company that focuses on these types of accessories.
So, I went on Amazon and got a couple of breakouts to cross-wire it all up. After a few quick, test QSOs, I was getting reports of low audio. That’s when a google check revealed that the TYT Mic was intended for use at 9 Volts… The Anytone only puts out 5 Volts. No worries, for $9 I got a 9V Buck converter, and a hobby-box to stick it all in.
Anytone AT-5888 Pinout on right
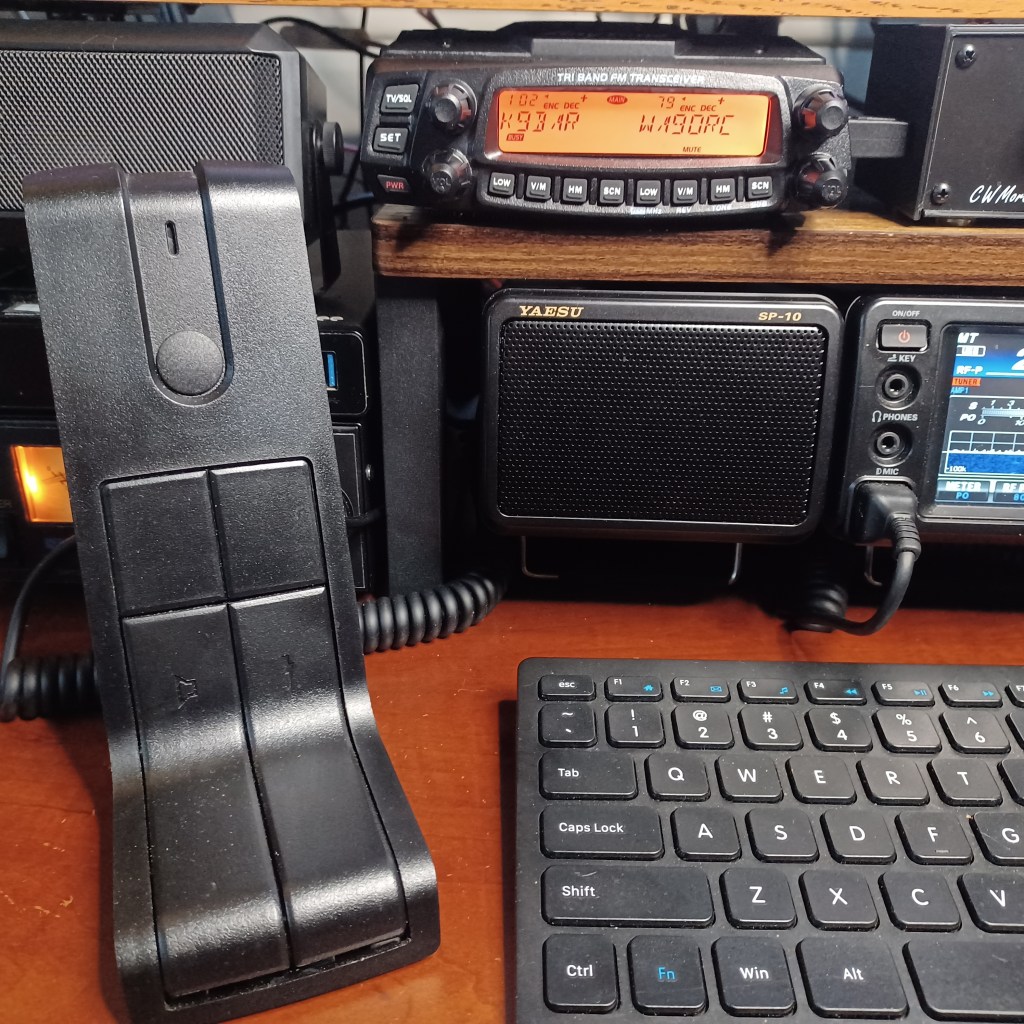
I know, I know… sloppy job. But I was slapping it together to finish in time for a 220 Net that night; I wanted to try it out. I even screwed the cover on before testing it. When I logged in to the Net, I was pleased to hear that my audio was full copy, with the gain right where it should be (about 1/4 turn from max).
So for about $25 in parts, I avoided spending $60 for a second Mic, and was able put that paper-weight TYT Mic to good use. I’m glad it worked… I felt like a chump for buying a TYT Radio every time I saw that Mic sitting around just collecting dust.
I was pleased to find that Anytone are among the ones that do their own engineering, testing, assembly and quality control. … It’s interesting to note: The only Chinese radios sold by DX Engineering and Gigaparts, are Anytones.
I’ve run into a lot of Hams that won’t buy a Chinese made radio… Some lump them all into one big category called Cheap Chinese Radios (CCR). Many have brand loyalty to one of the big-three Japanese manufacturers: Kenwood, Yaesu and/or ICOM. For HF, there’s a handful of other respected brands like Elecraft and Flexradio that are US companies. But for VHF/UHF, the market is full of radios from China by companies like Baoefeng, QYT, TYT, Wouxun, Anytone and others. Some believe all Chinese radios are made in the same factory, and are sold under different brand names.
Compounding the confusion, there are companies out there that don’t manufacture radios, but distribute them under their own brand name. Sometimes they’ll have minor differences in the firmware or features. But, looking at them supports the theory they’re all made in the same factory. From what I can tell, Retevis and Radiodity are examples of companies with this business model. Btech is another, but they don’t hide the fact that you’re getting a Baofeng.
Anytone AT-D878UV III vs. Radioddity GD-AT10G
The Anytone AT-D878UVII is considered by many to be one of the best DMR HT's out there. It is made in China by Qixiang Electron Science & Technology Co., Ltd, the company behind the Anytone name. Street price is about $320. Or, you can get the Radioddity GD-AT10G, that "looks" exactly the same without the Bluetooh and APRS features for about half that price. Who knows who makes the GD-AT10? Or, what other corners were cut to meet that price point... I'll stick with the Anytone.
My guess is that Non-Disclosure and Non-Compete are not part of the Chinese business dictionary. All these radios have been copied and re-engineered many times over. With enough money, you can go to a Chinese company and get them to manufacture a radio to your specifications and they’ll be happy to put any brand name you want on it… For a minimum quantity order.
QRZ-1 Explorer vs. TYT UV-88
The QRZ-1 HT was a collaboration with Gigaparts and QRZ.com to make a basic, easy to use HT available to new Hams as part of their Jump Start Program. It looks exactly like a TYT UV-88. But, the firmware is different; And, if you look close, the button functions are different to match the firmware changes. There's probably dozens of Chinese companies that will produce variations like these.
Even the companies that manufacture radios under their own brand name don’t make the components. There are companies that only make the enclosures (case). And companies specialized in making the printed circuit boards (PCB) that fit in those enclosures. Just pick a PCB from a radio that has most of what you want, and a case it will fit in with the buttons and knobs to make it work. Source the components and assemble. If you’re smart enough to modify the firmware, you too can be in the Amateur Radio business!
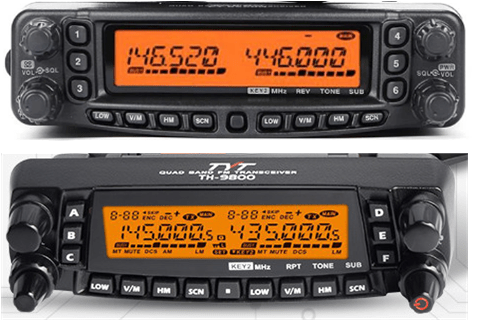
Yaesu FT-8900 vs TYT TH-9800
What motivated me to write this post is my experience with TYT. You can read my review of the TYT TH-98oo here and on eham.net. The TH9800 is a clone of the Yaesu FT-8900 quad-band radio. The Yaesu was discontinued so I tried the TH-9800. Long story short is, it crapped out after three months. I also tried a TYT TH-9000 for 222 Mhz which failed out-of-box… Bottom line is that in my experience, these TYT radios are garbage.
Anytone AT-5888UVIII
The big-three have abandoned the 1.25M segment and only offer a few HT’s with low power (1 to 5 Watts). Wanting a radio for 222 Mhz, I settled on the Anytone AT-5888UVII. It’s one of the few radios that will put out 25 watts on 1.25M. Alinco (a Japanese company) makes the DR-CS25 with full-power (50w) on 222 Mhz; But, it’s a mono-band radio, and I didn’t want to spend ~$260 without knowing how active the band was around here. I knew I’d get more use out of a Tri-Band. And with dual VFO, it is great for scanning 2m and 70cm while playing with my other radios. So… having been impressed with the quality of the Anytone AT-D878, I thought it was worth a try and see if the Anytone analog mobile radios are any good.
Before I chose the AT-5888, I did some research on some of these Chinese companies to find out which were mostly distributors of repackaged radios and which actually assemble their radios themselves. When I tried to get to the TYT website, I got a timeout error. The website might be blacklisted for some reason = RED FLAG! I was pleased to find that Anytone are among the ones that do their own engineering, testing, assembly and quality control.
It’s interesting to note: The only Chinese radios sold by DX Engineering and Gigaparts, are Anytones.
This is where I had a little trouble. Seems I’m not alone. Folks on the local 2 meter nets sometimes talk about confusion on how to connect a Hotspot to WiFi. So the next section will fast-forward to that step in the process.
This is where I had a little trouble. Seems I’m not alone. Folks on the local 2 meter nets sometimes talk about confusion on how to connect a Hotspot to WiFi. So the next section will fast-forward to that step in the process.
Get an RFID
Every User on DMR has an ID Number that’s linked to their Call Sign. The RFID is issued by RadioID.net. You’ll need this to setup your radio and join networks.
Join a Network
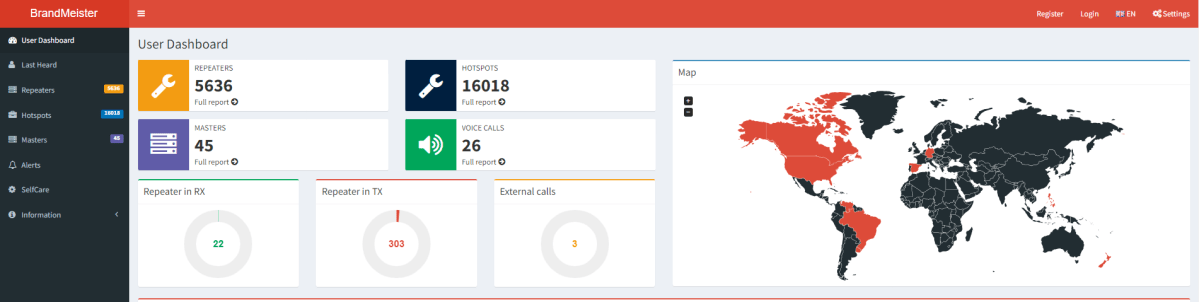
Register for an account on the Brandmeister Network. It’s easy and has an active worldwide talkgroup (TG 91) that will be good for testing your setup and making your first QSOs.
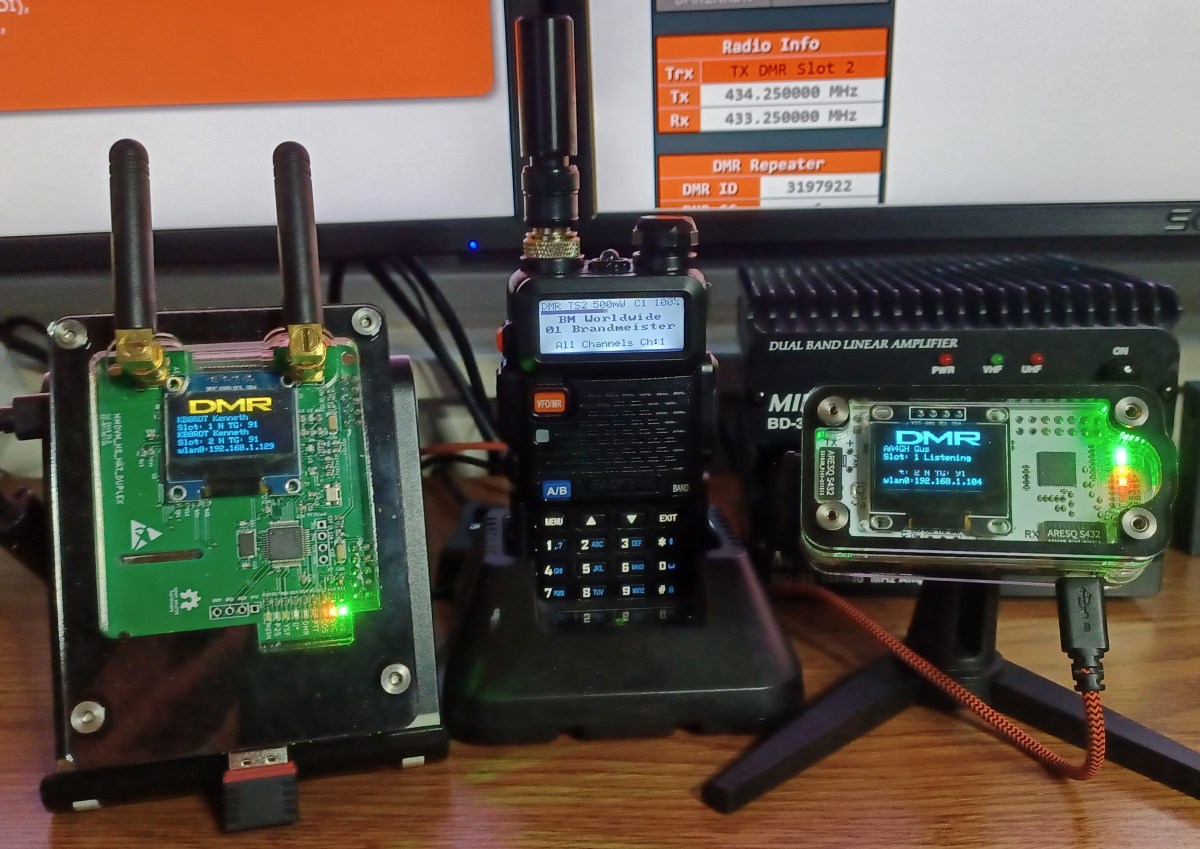
Get a Raspberry PI Hotspot
You can buy one or build one from parts (a bit cheaper and more fun); Ready made Hotspots and/or parts to build one are all over on Amazon, Aliexpress, and elsewhere.
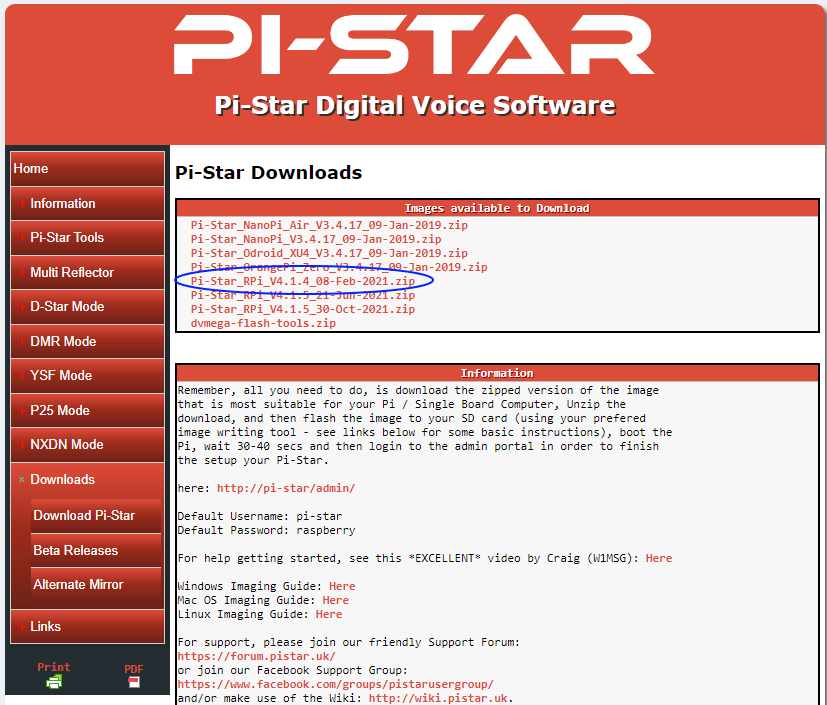
Download the latest version of the Pi Star image (img) file from pistar.uk
Select the latest “Pi-Star_RPi file”
Note the useful Information; You’ll need it later.
Burn the Pi Star boot image to a fresh micro SD card; An 8G card is plenty.
There’s loads of info on how to do this on the internet
Pi Star Downloads Page
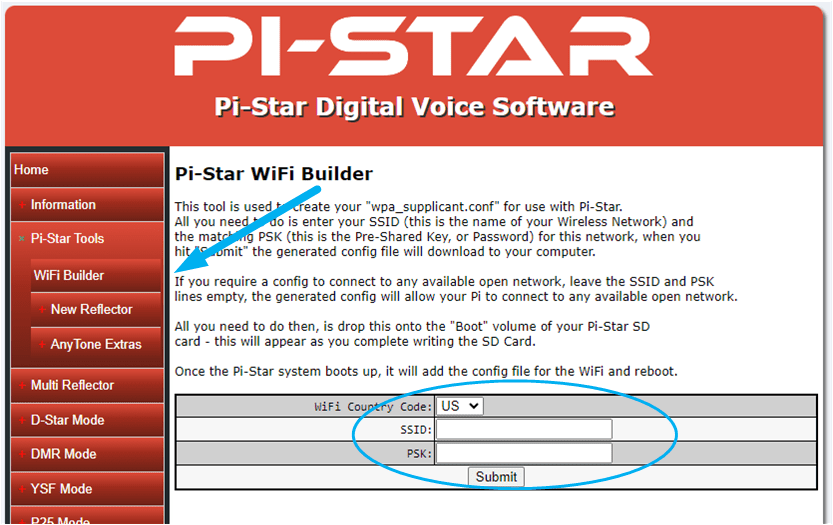
This is a point in the process where I discovered a significant “Wish I Had Known That Moment”. The next step is getting the Hotspot to connect to your WiFi. Turns out there’s several different ways to do this. Figuring out what’s easiest for you is the challenge. What follows is the method I’m most comfortable with… No dragging out cables and stuff.
Select the WiFi Builder, under Pi Star Tools in the left menu. This tool will create a file named “wpa_supplicant.config”. This file will tell your Raspberry Pi the WiFi settings at first boot up.
Pi Star WiFi Builder
Create a “wpa_supplicant.config” file
You’ll need the SSID and WPA Password for your WiFi network.
The file will be written to your Downloads folder
Copy the “wpa_supplicant.config” file to the root on the Pi Star Boot micro SD card you just made
Insert the card into your Hotspot and Power it ON
As mentioned, there are other ways of getting the WiFi settings right. You can connect a monitor and keyboard to your Pi and configure the WiFi by command line. Or, you can connect the Hotspot to your router via Cable, or connect it direct to your PC with a cross-over cable. This gets you into the Pi Star Dashboard by entering pi-star.local in your browsers address bar. From there, you can manually set the WiFi. For me, creating the file and letting the Pi do the work is easiest.
The wpa_supplicant.config file is used by your Raspberry PI during initial boot-up to set the WiFi connection to your network. Pi Star will apply these same settings automatically. It may take several minutes for your hotspot to fully boot; Older, less powerful PIs will take longer.
If your Hotspot has a OLED, you’ll know when it started up. If not, watch the LEDs; The green and yellow should be constant, and the red LED next to the green one should be flashing. Note: After initial boot… the wpa_supplicant.config file will be deleted from the SD card automatically.
There’s a multitude of reasons folks get into DMR. It may be helpful if you first answer to yourself the questions below. They may steer your choices in which DMR network to join, or equipment choices and such down the road.
I think I’ve finally fully recovered from my “DMR phase”. Soon after I got my ticket, and almost immediately after I started this blog, I went down the rabbit hole of Digital Mobile Radio (DMR). That partially explains why there hasn’t been a post in awhile… I say partially because, immediately after I emerged from the DMR maze I dove right in to FT8 (more later).
I’ve always been a computer geek of sorts, but in no way a programmer or developer. I once had a role where I worked that included being the “IT guy” for about 25 end-users back in the Windows 98 and XP days. I’ve put up a few Windows 2000 servers and a Linux box running an Intranet server. Our main MRP server ran Linux RedHat, 3.2 I believe. Remember those days? The merging of computers with Ham radio was a driving factor in getting my license. Plus giving me an excuse to build a few more Raspberry Pi projects… BONUS!
This blog is not about trying to explain stuff about stuff that’s already overflowing on the internet like “What is DMR?” or, how it works. Frankly, I’m not sure I know. This blog also isn’t about me trying to come off as some kind of expert and impress you with my new found knowledge. It’s just me sharing my experiences. Sometimes, just knowing where to start is helpful.
There’s a multitude of reasons folks get into DMR. It may be helpful if you first answer to yourself the questions below. They may steer your choices in which DMR network to join, or equipment choices and such down the road.
Why do I want to get on DMR?
Ragchew
Log Contacts (gets old quick)
Talk to direct (known) contacts worldwide
Talk to operators with common interests regionally or worldwide
Do they work with the DMR Networks and/or Talkgroups I want?
Am I going to need, or do I want a Hotspot?
Buy it or Build it?
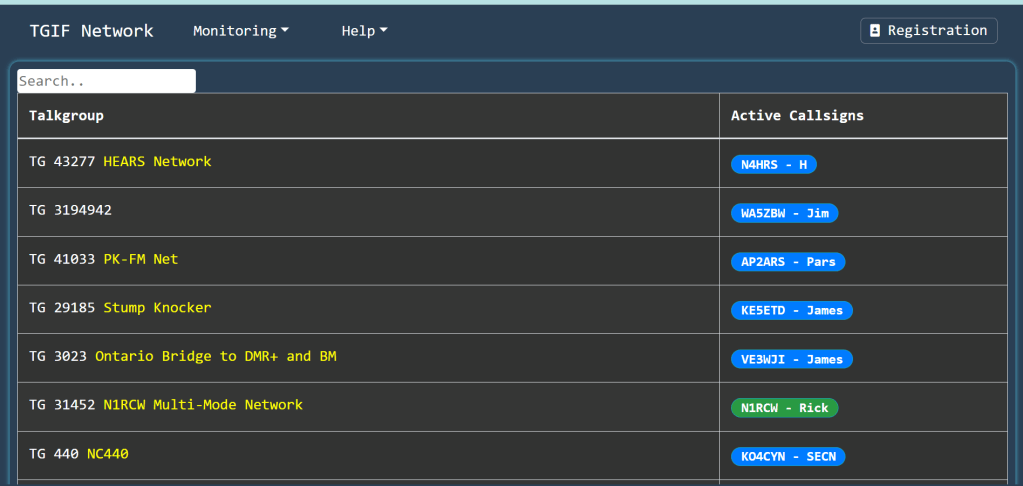
After doing all the research to answer the questions intelligently, and assuming you still want to take a dive into DMR… The next thing is you’ll need to choose which DMR Network you want to join. The Brandmeister Network is popular and a good place to start. For more focused talkgroups you may want to look at the TGIF Network. There’s more, but I’ve only used these two. Both these networks have a web page that lets you see what’s happening real-time. TGIF talkgroups have descriptive names as to what they’re about… sometimes it’s fun watching the names of the talkgroups scroll by.
Another option is DMR-MARC, if you’re fortunate enough to have a DMR-MARC repeater in your area.
Like I said… I’m a geek. So the driving force for me was just getting it to work for any and all of the above. I didn’t say doing any of the above. For me, it’s the challenge and learning experience of getting it to work. Note: After making a bunch of contacts to prove everything worked, I haven’t even turned on my Hotspot in a week or so. I was working on FT8 🙂
So with that, I’m putting together a bullet list of what I believe is the easiest and most direct path of stuff you need “TO-DO” to get operational on DMR. BTW: This is not the path I took stumbling down the DMR rabbit hole… This is the “wish I had known” version.
I loved the dual receive and the fast scanning. That is… Until it crapped out on me after about two months
Quad Band 50W Mobile
This was my first mobile rig for Ham use. I chose it because can transmit on four bands; 10m, 6m, 2m and 70cm. I thought to myself “great, I can play on all the bands a Tech can use”. Good theory, but I discovered I was ignorant to the fact the TH-9800 only works in FM mode; There’s not much activity in FM on these bands… But, I can talk to myself.
Aside from not being much use on 10 and 6 meters, I love this radio. Research tells me its a Chinese clone of the Yaesu FT-8900, now discontinued. I got the RT-Systems programming software, a Comet UHV-4 quad band antenna (not cheap), and picked up a hard-to-find Desk Microphone made for the TH-9800.
I loved the dual receive and the fast scanning. That is… Until it crapped out on me after about two months😦
I saw the mixed reviews before I ordered it. They were all over the map from saying this radio is great to it’s garbage. I figured it was a gamble on this rig. Well, I LOSE! One day, the left side receive just stopped working. See my Product Review on eHam.net. Fortunately, I purchased the optional insurance and was able to send it back.